
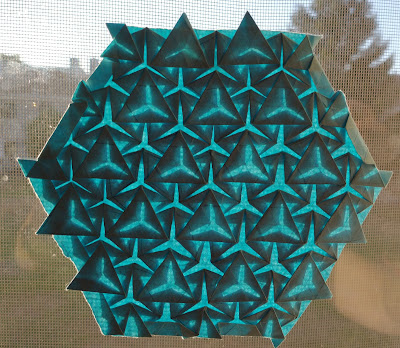
Origami Tessellation: Hexagon Kisses


This is a tessellation by Arseniy K @arsenikoom that I solved. His version had more distance between repeats. It also featured a some rectangles joined by a triangle. 

I chose to just do a straight up repeat of his central module. Firstly, because it would repeat better on a 32 pleat grid.

I don't use paper that allows for larger grids. Even 32 pleats is pushing it with the paper I use.

All my origami tessellations are folded with ordinary 8.5 x 11 printer paper. I use 20, 24 and 28 lb. papers, depending on the design and the time of year. 20 lb. paper works fine in winter, but not so well during summer months. Occasionally I use kraft paper. But kraft paper is difficult to fold because it's so thick. It also doesn't backlight well at all. 


Back in the day, I used to just fold a triangle grid on the rectangular paper without trimming it.

Nowadays I stick with trimming it down to a hexagon. It makes it quicker to fold the initial grid. It also makes it easier for my stubby fingers to reach the center. Unfortunately, I am not in possession of hands genetically suited for origami. 

Secondly, I sometimes just prefer a simple repeat. I can be lazy like that. 

I have reverse engineered a bunch of his origami models. Most of them are pretty tricky.


This one gave me no trouble at all. Maybe because I'm familiar with his style. Maybe I've gotten more skilled. Maybe this one was just a little less hard to solve. Probably, all of the above. 

Crease Pattern is included at the bottom. 


Comments

Popular posts from this blog

Infinite Triangles Origami Tessellation

This is just a flash idea I had. There was no planning involved. No inspiration. I just started folding and followed the lure of the creases in the paper.  Upon seeing the finished result, It kind of reminds me of Robin Scholz's Triphilia tessellation, but the construction is definitely different and I was not thinking of that as I was crafting it. The similarity is that you can arrange the layering of the triangles into different patterns of your choice.  I went looking and discovered  I had folded this a few years ago and called it Triangle Temptations . I didn't realize this until after I'd completed this model.  Apparently, according to my original post, I'd seen someone else fold it on flickr and recreated it.  This happens sometimes. You hit on an idea and it's something you've done and forgotten. They linger in the back of your brain and come forward unexpectedly.  That previous version differed from this one slightly, in that it used double sized cross g

Micro Rhombus Stars Origami Tessellation

 This tessellation is micro rhombus star twists. I'm pretty sure I've seen this done with larger size rhombuses, but not with ones this size. They are the smallest natural rhombuses of the triangle grid.  The center is achieved by collapsing a small hexagon.  On the other side there are small hex twists and open back triangle twists.  Since the shapes are rather small, it's a little bit difficult to fold.  It's probably more of a cool weather tessellation. Humidity does the paper no favors on such small designs. But the ideas come when they do.  Reverse view and crease pattern images follow. 

What If Caviar Could Talk Variant

 This origami tessellation is a variant of one by Arseniy K. He named his 'What If Caviar Could Talk'. After I had solved his design, I decided that I wasn't up to  reproducing it exactly as he had folded his. Perhaps another time, in the future. So I changed things up a little to make it slightly less difficult.  Both designs have a foundation of open back hex twists with triangle twists around them, He used micro rhombuses between the repeats.  In my case, I used larger natural rhombuses instead.  Still a difficult fold to execute, but much less so.  It still required thick paper. I used tant folded into a 32 pleat triangle grid.  You can see from the photo of the reverse side how densely packed everything is.  It's a few layers deep. So be prepared to wrestle with that.  My crease pattern for this iteration is included at the end.  To fold his, sub out small natural rhombuses in place of my larger ones. 
Solving Origami Tessellations dot com