
Rosebuds Tessellation by GatheringFolds


 This tessellation by gatheringfolds had me stumped. She alluded to a fold she referred to as a closed hexagon twist. This was not something with which I was familiar. This was not something I'd ever discovered or encountered. It was totally new to me. 

I've been doing origami tessellations for the better part of 5 years and I thought that I knew all the folds and all the tricks. I did not. 

Watching the beginning of her video tutorial showed me the unusual fold which she had used in this particular tessellation. If I had not watched it, I'm not sure whether or not I would've ever figured out the concept. 

So, my take away is that there's always more to learn. 


Once I understood this new shape/fold, I was all good to finish the process of replicating the design. 

It also occurred to me that it works in a similar fashion to what I call offset hex twists. Where in an alternating pattern, three of the shapes that emanate from it can exist on the front and the other three can be on the back. Some examples would be: Crowding Helicopters Tessellation, Minty Flowers Tess and Checkerboard Origami Tessellation. Knowing that's how it works is a big clue to solving it. 

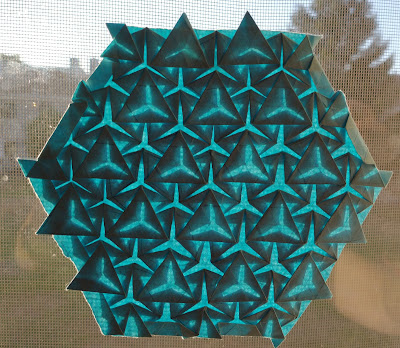
I took a photo of the model in its 3D state where it features the rosebuds. That's the first image. 

I also took a photo of the same design completely flattened. It's not as impressive, but is technically the same. 

I do not have a crease pattern for this. I did not create one since technically I did not fully solve it. Once I saw how she folded the rosebuds, I just added the necessary triangles and repeated.

You can learn to fold it in her instagram tutorial if my clues are insufficient. 

Comments

Popular posts from this blog

Infinite Triangles Origami Tessellation

This is just a flash idea I had. There was no planning involved. No inspiration. I just started folding and followed the lure of the creases in the paper.  Upon seeing the finished result, It kind of reminds me of Robin Scholz's Triphilia tessellation, but the construction is definitely different and I was not thinking of that as I was crafting it. The similarity is that you can arrange the layering of the triangles into different patterns of your choice.  I went looking and discovered  I had folded this a few years ago and called it Triangle Temptations . I didn't realize this until after I'd completed this model.  Apparently, according to my original post, I'd seen someone else fold it on flickr and recreated it.  This happens sometimes. You hit on an idea and it's something you've done and forgotten. They linger in the back of your brain and come forward unexpectedly.  That previous version differed from this one slightly, in that it used double sized cross g

Micro Rhombus Stars Origami Tessellation

 This tessellation is micro rhombus star twists. I'm pretty sure I've seen this done with larger size rhombuses, but not with ones this size. They are the smallest natural rhombuses of the triangle grid.  The center is achieved by collapsing a small hexagon.  On the other side there are small hex twists and open back triangle twists.  Since the shapes are rather small, it's a little bit difficult to fold.  It's probably more of a cool weather tessellation. Humidity does the paper no favors on such small designs. But the ideas come when they do.  Reverse view and crease pattern images follow. 

What If Caviar Could Talk Variant

 This origami tessellation is a variant of one by Arseniy K. He named his 'What If Caviar Could Talk'. After I had solved his design, I decided that I wasn't up to  reproducing it exactly as he had folded his. Perhaps another time, in the future. So I changed things up a little to make it slightly less difficult.  Both designs have a foundation of open back hex twists with triangle twists around them, He used micro rhombuses between the repeats.  In my case, I used larger natural rhombuses instead.  Still a difficult fold to execute, but much less so.  It still required thick paper. I used tant folded into a 32 pleat triangle grid.  You can see from the photo of the reverse side how densely packed everything is.  It's a few layers deep. So be prepared to wrestle with that.  My crease pattern for this iteration is included at the end.  To fold his, sub out small natural rhombuses in place of my larger ones. 
Solving Origami Tessellations dot com