
Precarious Connections Origami Tessellation

This is the tessellation that I reference in the previous post. I had the central idea. That came to me quite easily. It wasn't hard to figure out how to repeat that. However, when I did, I was left with a rather large gap that I didn't know how to fill.
I played around with various sets of shapes and still wasn't sure what would actually work.
When you're stuck, sometimes it's best to just take a step back and work on something else for a while. So, I did.
A week later, I was thinking about it again and came up with a new plan to reconcile those empty spaces. I still knew that it wasn't quite right, but that I was almost there.
At that point, I decided I would go with what I had so far and see if I could figure out the final answer as I folded it. This isn't an approach that I usually take. It risks wasting fancy paper and a lot of grid folding time. But, occasionally, this is the only way for me to figure trickier things out completely. It doesn't always work, but in this case, it did.
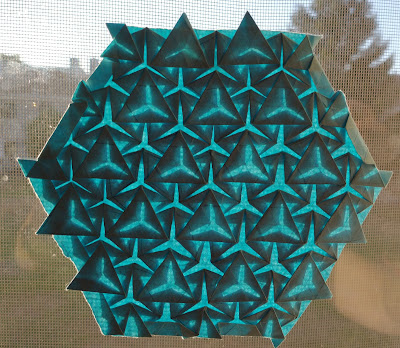
As I was working the parts that I knew were correct and the remaining gaps were beginning to scrunch and twist, I realized how I could make it work. It turned out to be a method I don't think that I've ever used before. Collapsed hexagons overlapped by triangle twists. If you zoom in to the full sized image, you can probably see the details of it much better. Take a look.

Crease pattern included.

This is an advanced tessellation for sure. It's not easy to do all those flagstone style connections and then also do the collapses. Use sturdy paper and be prepared to fuss over it a lot.
Filed under: March 2026 Origami Tessellations


Comments